项目背景
最近帮平台组做 UI 自动化测试,在多次调研下,选定阿里的 macaca 作为技术栈,参考 sample-nodejs,在模板 macaca-nodejs-boilerplate 的基础下进行 UI 自动化测试的开发
前期准备
因为 UI 自动化测试需要用到 CSS 选择器,为了查找的方便,要在做自动化测试的项目中设置锚点,本人以 name="" 属性作为自动化测试的锚点
研究过程以及疑难点
查看报告结果
目标:在 macaca 编译成功输出报告后打开相应的浏览器查看
- 安装 open 库
yarn add open- 编写 open.js 工具类
const open = require('open');
const path = require('path');

// Opens the image in the default image viewer
(async () => {
  // Specify app arguments
  await open(path.join(__dirname, '..', 'reports', 'index.html'), { app: 'chrome' });
})();- 在 package.json 文件调用
"scripts": {
  "doctor": "macaca doctor",
  "start": "npm run test:chrome & yarn test:report", // 注意必须要用 & 否则测试失败后不会调用
  "test:chrome": "cross-env browser=chrome npm run test:desktop-browser",
  "test:desktop-browser": "macaca run --reporter macaca-reporter --verbose -d ./test/index.js",
  "test:report": "node ./utils/open.js"
}
自定义截图到 screenshots 文件夹下
在 wx-extend.js 中编写自定义方法
wd.addPromiseChainMethod('customSaveScreenshot', function(context) {
  const filepath = path.join(__dirname, '..', 'screenshots', `${_.uuid()}.png`);
  const reportspath = path.join(__dirname, '..', 'reports');
  _.mkdir(path.dirname(filepath));
  return this.saveScreenshot(filepath).then(() => {
    appendToContext(context, `${path.relative(reportspath, filepath)}`);
  });
});
调用相同逻辑的操作步骤
实际上考察的是 Promise 的用法
const Promise = require('bluebird');

const array = [1, 2, 3, 4];
// 调用 Promise.reduce 以实现链式顺序调用
// 其中 reduce 方法是从第 2 个数据开始遍历的,故需要在 array 前加 null
return driver
  .then(() => Promise.reduce([null, ...array], (total, graph, index) => {
      return driver
      .elementByCss(选择器)
      .click()
      .sleep(1000)
    }
  ))
});
模拟上传文件操作
项目中用的是 antd 的框架,这里尝试了几种方式
domEvent
调用 domEvent 方法模拟 <input type="file"> 的 change 操作
driver.elementByCss('#input-element').domEvent('change', {
  data: {
    files: [{ file: 'foo.jpg' }]
  }
});
在 antd 中不成功,估计是需要调用 upload 组件的方法才起作用
sendKeys
sendKeys 方法直接赋值给 input 控件也是不成功,原因同上
用 autoit 软件编辑脚本,模拟上传操作
-
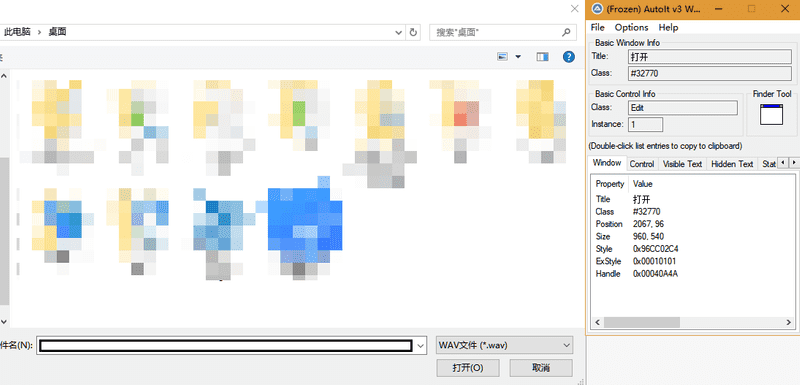
首先在官网下载 autoit 软件,安装完毕后打开上传窗口同时打开 autoit 软件,找出文件名和打开两个控件所对应的 ID,如下图
![2019 04 16 19 57 29]()
-
打开编辑器,添加以下代码
ControlFocus("[Class:#32770]","","Edit1") // 对文件名发起焦点事件 WinWait("[Class:#32770]","",10) // 等待 10 ms ControlSetText("[Class:#32770]","","Edit1",$CmdLine[1]) // 对文件名赋值,其中 $CmdLine[1] 代表调用命令的第一个参数 Sleep(2000) ControlClick("[Class:#32770]","","Button1") // 点击打开按钮 -
编译以上代码生成 upload.exe
-
在 wx-extend.js 中编写自定义方法
require('shelljs/global'); wd.addPromiseChainMethod('uploadFile', function(filePath) { const uploadPath = path.resolve(__dirname, upload.exe所在目录); const voicePath = path.resolve(__dirname, 上传文件所在目录); exec(`${uploadPath} ${path.join(voicePath, filePath)}`); }); -
愉快的调用方法,成功上传
driver.uploadFile(文件名);
