基础
简介
entry(入口)
入口起点(entry point)即是 webpack 通过该起点找到本次项目所直接或间接依赖的资源(模块、库等),并对其进行处理,最后输出到 bundle 中。入口文件由用户自定义,可以是一个或者多个,每一个 entry 最后对应一个 bundle。
output(出口)
通过配置 output 属性可以告诉 webpack 将 bundle 命名并输出到对应的位置。
loader
webpack 核心,webpack 本身只能识别 js 文件,对于非 js 文件,即需要 loader 转换为 js 文件。换句话说,Loader 就是资源转换器。由于在 webpack 里,所有的资源都是模块,不同资源都最终转化成 js 去处理。针对不同形式的资源采用不同的 Loader 去编译,这就是 Loader 的意义。
插件(plugin)
webpack 核心,loader 处理非 js 文件,那么插件可以有更广泛的用途。整个 webpack 其实就是各类的插件形成的,插件的范围包括,从打包优化和压缩,一直到重新定义环境中的变量。插件接口功能极其强大,可以用来处理各种各样的任务。
Chunk
被 entry 所依赖的额外的代码块,同样可以包含一个或者多个文件。chunk 也就是一个个的 js 文件,在异步加载中用处很大。chunk 实际上就是 webpack 打包后的产物,如果你不想最后生成一个包含所有的 bundle,那么可以生成一个个 chunk,并通过按需加载引入。同时它还能通过插件提取公共依赖生成公共 chunk,避免多个 bundle 中有多个相同的依赖代码。
实践 & 优化
url-loader & image-webpack-loader
url-loader 可以在文件大小(单位 byte)低于指定的限制,将文件转换为 DataURL,这在实际开发中非常有效,能够减少请求数,在 vue-cli 和 create-react-app 中也都能看到对这个 loader 的使用。
// "url" loader works just like "file" loader but it also embeds
// assets smaller than specified size as data URLs to avoid requests.
{
  test: [/\.bmp$/, /\.gif$/, /\.jpe?g$/, /\.png$/],
  loader: require.resolve('url-loader'),
  options: {
    limit: 10000,
    name: 'static/media/[name].[hash:8].[ext]',
  },
},
image-webpack-loader 这是一个可以通过设置质量参数来压缩图片的插件,但个人觉得在实际开发中并不会经常使用,图片一般是 UI 提供,一般来说,他们是不会同意改变图片的质量。
资源私有化
以这种方式加载资源,你可以以更直观的方式将模块和资源组合在一起。无需依赖于含有全部资源的 /assets 目录,而是将资源与代码组合在一起。例如,类似这样的结构会非常有用
- |- /assets
+ |– /components
+ |  |– /my-component
+ |  |  |– index.jsx
+ |  |  |– index.css
+ |  |  |– icon.svg
+ |  |  |– img.png
当然,这种选择见仁见智
Tree-Shaking
前端中的 tree-shaking 就是将一些无关的代码删掉不打包。在 Webpack 项目中,我们通常会引用很多文件,但实际上我们只引用了其中的某些模块,但却需要引入整个文件进行打包,会导致我们的打包结果变得很大,通过 tree-shaking 将没有使用的模块摇掉,这样来达到删除无用代码的目的。
Tree-Shaking 的原理可以参考这篇文章
归纳起来就是
- ES6 的模块引入是静态分析的,故而可以在编译时正确判断到底加载了什么代码。
- 分析程序流,判断哪些变量未被使用、引用,进而删除此代码
归纳起来就是
因为 Babel 的转译,使得引用包的代码有了副作用,而副作用会导致 Tree-Shaking 失效。
Webpack 4 默认启用了 Tree Shaking。对副作用进行了消除,以下是在 4.19.1 的实验
index.js
import { cube } from './math.js';

console.log(cube(5));
math.js
// 不打包 square
export class square {
  constructor() {
    console.log('square');
  }
}

export class cube {
  constructor(x) {
    return x * x * x;
  }
}// babel 编译后,同不打包
'use strict';
Object.defineProperty(exports, '__esModule', {
value: true
});
exports.cube = cube;
function _classCallCheck(instance, Constructor) {
if (!(instance instanceof Constructor)) {
throw new TypeError('Cannot call a class as a function');
}
}
var square = (exports.square = function square() {
_classCallCheck(this, square);
console.log('square');
});
function cube(x) {
console.log('cube');
return x * x * x;
}// 不打包
export function square(x) {
console.log('square');
return x.a;
}
export function cube(x) {
return x * x * x;
}// wow 被打包
export function square() {
console.log('square');
return x.a;
}
square({ a: 1 });
export function cube() {
return x * x * x;
}sourcemap
简单说,Source map 就是一个信息文件,里面储存着位置信息。也就是说,转换后的代码的每一个位置,所对应的转换前的位置。
有了它,出错的时候,除错工具将直接显示原始代码,而不是转换后的代码,这无疑给开发者带来了很大方便。
webpack 中的 devtool 配置项可以设置 sourcemap,可以参考官方文档,然而 devtool 的许多选项都讲的不是很清楚,这里推荐该文章,讲的比较详细
要注意,避免在生产中使用 inline-* 和 eval-*,因为它们可以增加 bundle 大小,并降低整体性能。
模块热替换
热替换这一块目前大多数都是用的 webpack-dev-middleware 插件配合服务器使用的,而官方提供的 watch 模式反而比较少用,当然 webpack-dev-middleware 的底层监听 watch mode
至于为什么不直接使用 watch 模式,则是 webpack-dev-middleware 快速编译,走内存;只依赖 webpack 的 watch mode 来监听文件变更,自动打包、每次变更都将新文件打包到本地,就会很慢。
DefinePlugin
webpack.DefinePlugin 定义环境变量 process.env,这在实际开发中比较常用,参考 create-react-app 中的代码如下:
// Makes some environment variables available to the JS code, for example:
// if (process.env.NODE_ENV === 'development') { ... }. See `./env.js`.
new webpack.DefinePlugin(env.stringified)
不过,要注意不能在 config 中使用,因为
process.env.NODE_ENV === 'production' ? '[name].[hash].bundle.js' : '[name].bundle.js';NODE_ENV is set in the compiled code, not in the webpack.config.js file. You should not use enviroment variables in your configuration. Pass options via —env.option abc and export a function from the webpack.config.js.
大致意思就是 NODE_ENV 是设置在 compiled 里面,而不是 config 文件里。
ExtractTextWebpackPlugin
ExtractTextWebpackPlugin 将 css 抽取成单独文件,可以通过这种方式配合后端对 css 文件进行缓存。
SplitChunksPlugin
webpack4 的代码分割插件。
webpack4 中支持了零配置的特性,同时对块打包也做了优化,CommonsChunkPlugin 已经被移除了,现在是使用 optimization.splitChunks 代替。SplitChunksPlugin 的配置有几个需要比较关注一下
- async: 默认值, 将按需引用的模块打包
- initial: 分开优化打包异步和非异步模块
- all: all 会把异步和非异步同时进行优化打包。也就是说 moduleA 在 indexA 中异步引入,indexB 中同步引入,initial 下 moduleA 会出现在两个打包块中,而 all 只会出现一个。
使用 cacheGroups 可以自定义配置打包块。
动态引入
利用动态引入的文件打包成另一个包并懒加载它,其与 SplitChunksPlugin 的 cacheGroups 区别:
- Bundle splitting:实际上就是创建多个更小的文件,并行加载,以获得更好的缓存效果;主要的作用就是使浏览器并行下载,提高下载速度。并且运用浏览器缓存,只有代码被修改,文件名中的哈希值改变了才会去再次加载
- Code splitting:只加载用户最需要的部分,其余的代码都遵从懒加载的策略;主要的作用就是加快页面加载速度,不加载不必要加载的东西。
参考代码:
import _ from 'lodash';

function component() {
  var element = document.createElement('div');
  var button = document.createElement('button');
  var br = document.createElement('br');

  button.innerHTML = 'Click me and look at the console!';
  element.innerHTML = _.join(['Hello', 'webpack'], ' ');
  element.appendChild(br);
  element.appendChild(button);

  // Note that because a network request is involved, some indication
  // of loading would need to be shown in a production-level site/app.
  button.onclick = (e) =>
    import(/* webpackChunkName: "print" */ './print').then((module) => {
      var print = module.default;

      print();
    });

  return element;
}

document.body.appendChild(component());
注意当调用 ES6 模块的 import() 方法(引入模块)时,必须指向模块的 .default 值,因为它才是 promise 被处理后返回的实际的 module 对象。
缓存 runtimeChunk
因为 webpack 会把运行时代码放到最后的一个 bundle 中,所以即使我们修改了其他文件的代码,最后的一个 bundle 的 hash 也会改变,runtimeChunk 是把运行时代码单独提取出来的配置。这样就有利于我们和后端配合缓存文件。
- single: 所有入口共享一个生成的 runtimeChunk
- true/mutiple: 每个入口生成一个单独的 runtimeChunk
模块标识符
有时候我们只是添加了个文件 print.js, 并在 index 引入
import Print from './print';打包的时候,期望只有 runtime 和 main 两个 bundle 的 hash 发生改变,但是通常所有 bundle 都发生了变化,因为每个 module.id 会基于默认的解析顺序(resolve order)进行增量。也就是说,当解析顺序发生变化,ID 也会随之改变。
可以使用两个插件来解决这个问题。第一个插件是 NamedModulesPlugin,将使用模块的路径,而不是数字标识符。虽然此插件有助于在开发过程中输出结果的可读性,然而执行时间会长一些。第二个选择是使用 HashedModuleIdsPlugin。
ProvidePlugin
通过 ProvidePlugin 处理全局变量,以及其他更细粒度的处理
polyfills 的处理
首先了解一下 polyfills, 虽然在 webpack 中能够使用 es6\es7 等的 API,但并不代表编译器支持这些 API,所以通常我们会用 polyfills 来自定义一个 API。
那么在 webpack 中,一般是使用 babel-polyfill VS babel-runtime VS babel-preset-env 等来支持这些 API,而这三种怎么选择也是一个问题。
在真正进入主题之前,我们先看一个 preset-env 的配置项,同时也是 package.json 中的一个配置项 browserslist
{
  "browserslist": ["last 1 version", "> 1%", "maintained node versions", "not dead"]
}
根据这个配置,preset-env 或者 postcss 等会根据你的参数支持不同的 polyfills,具体的参数配置参考该文章
- babel-polyfill 只需要引入一次,但会重写一些原生的已支持的方法,而且体积很大。
- transform-runtime 是利用 plugin 自动识别并替换代码中的新特性,你不需要再引入,只需要装好 babel-runtime 和 配好 plugin 就可以了。好处是按需替换,检测到你需要哪个,就引入哪个 polyfill,值得注意的是,instance 上新添加的一些方法,babel-plugin-transform-runtime 是没有做处理的,比如 数组的 includes, filter, fill 等
- babel-preset-env 根据当前的运行环境,自动确定你需要的 plugins 和 polyfills。通过各个 es 标准 feature 在不同浏览器以及 node 版本的支持情况,再去维护一个 feature 跟 plugins 之间的映射关系,最终确定需要的 plugins。
后编译
日常我们引用的 Npm 包都是编译好的,这样带来的方便的同时也暴露了一些问题。
代码冗余:一般来说,这些 NPM 包也是基于 ES2015+ 开发的,每个包都需要经过 babel 编译发布后才能被主应用使用,而这个编译过程往往会附加很多“编译代码”;每个包都会有一些相同的编译代码,这就造成大量代码的冗余,并且这部分冗余代码是不能通过 Tree Shaking 等技术去除掉的。
非必要的依赖:考虑到组件库的场景,通常我们为了方便一股脑引入了所有组件;但实际情况下对于一个应用而言可能只是用到了部分组件,此时如果全部引入,也会造成代码冗余。
所以我们自己的公司组件可以采用后编译的形式,即发布的是未经编译的 npm 包,在项目构建时才编译,我们公司采用的也是这种做法,因为我们的包都在一个目录下,所以不用考虑递归编译的问题。
设置环境变量
这个比较简单,直接看代码或者官方文档即可
webpack --env.NODE_ENV=local --env.production --progress其他插件
- CompressionWebpackPlugin 将文件压缩 文件大小减小很多 需要后端协助配置
- mini-css-extract-plugin 将 CSS 分离出来
- wbepack.IgnorePlugin 忽略匹配的模块
- uglifyjs-webpack-plugin 代码丑化,webpack4 的 mode(product)自动配置
- optimize-css-assets-webpack-plugincss 压缩
- webpack-md5-hash 使你的 chunk 根据内容生成 md5,用这个 md5 取代 webpack chunkhash。
- dllPlugin 提高构建速度
插件机制
Tapable
Webpack 的插件机制依赖于一个核心的库 Tapable。
Tapable 是什么
tapable 是一个类似于 nodejs 的 EventEmitter 的库, 主要是控制钩子函数的发布与订阅。当然,tapable 提供的 hook 机制比较全面,分为同步和异步两个大类(异步中又区分异步并行和异步串行),而根据事件执行的终止条件的不同,由衍生出 Bail/Waterfall/Loop 类型。
Tapable 的使用
基本使用
const { SyncHook } = require('tapable');

// 创建一个同步 Hook,指定参数
const hook = new SyncHook(['arg1', 'arg2']);

// 注册
hook.tap('a', function(arg1, arg2) {
  console.log('a');
});

hook.tap('b', function(arg1, arg2) {
  console.log('b');
});

hook.call(1, 2);
钩子类型
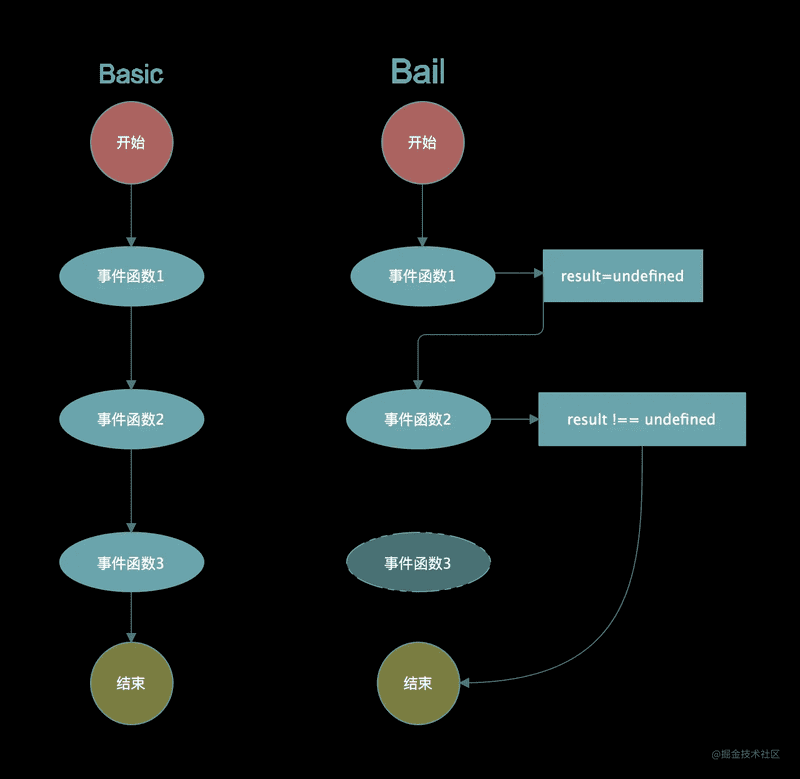
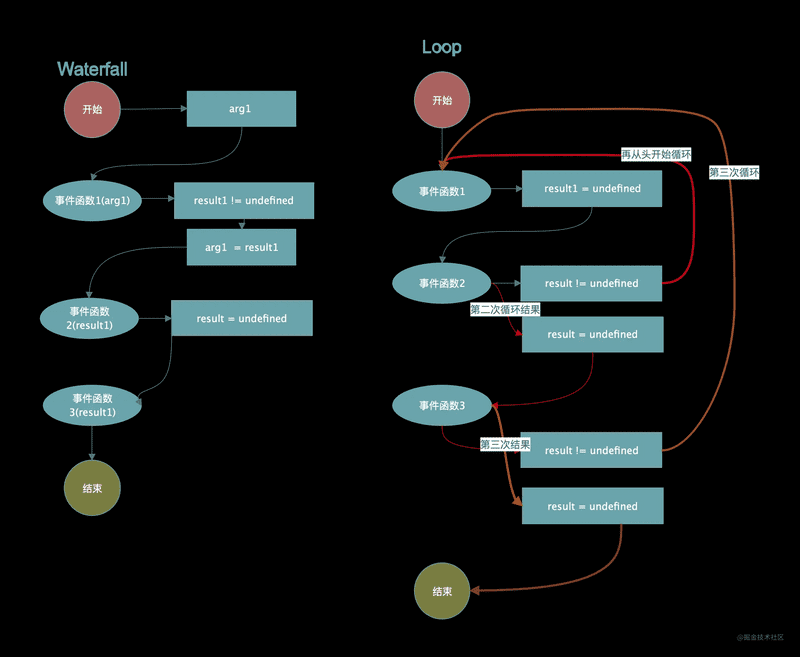
BasicHook
执行每一个,不关心函数的返回值,有 SyncHook、AsyncParallelHook、AsyncSeriesHook。
BailHook
顺序执行 Hook,遇到第一个结果 result!==undefined 则返回,不再继续执行。有:SyncBailHook、AsyncSeriseBailHook, AsyncParallelBailHook。
什么样的场景下会使用到 BailHook 呢?设想如下一个例子:假设我们有一个模块 M,如果它满足 A 或者 B 或者 C 三者任何一个条件,就将其打包为一个单独的。这里的 A、B、C 不存在先后顺序,那么就可以使用 AsyncParallelBailHook 来解决:
x.hooks.拆分模块的Hook.tap('A', () => {
  if (A 判断条件满足) {
    return true
  }
})
x.hooks.拆分模块的Hook.tap('B', () => {
  if (B 判断条件满足) {
    return true
  }
})
x.hooks.拆分模块的Hook.tap('C', () => {
  if (C 判断条件满足) {
    return true
  }
})
如果 A 中返回为 true,那么就无须再去判断 B 和 C。但是当 A、B、C 的校验,需要严格遵循先后顺序时,就需要使用有顺序的 SyncBailHook(A、B、C 是同步函数时使用) 或者 AsyncSeriseBailHook(A、B、C 是异步函数时使用)。
WaterfallHook
类似于 reduce,如果前一个 Hook 函数的结果 result !== undefined,则 result 会作为后一个 Hook 函数的第一个参数。既然是顺序执行,那么就只有 Sync 和 AsyncSeries 类中提供这个 Hook:SyncWaterfallHook,AsyncSeriesWaterfallHook
当一个数据,需要经过 A,B,C 三个阶段的处理得到最终结果,并且 A 中如果满足条件 a 就处理,否则不处理,B 和 C 同样,那么可以使用如下
x.hooks.tap('A', (data) => {
  if (满足 A 需要处理的条件) {
    // 处理数据 data
    return data
  } else {
    return
  }
})
x.hooks.tap('B', (data) => {
  if (满足B需要处理的条件) {
    // 处理数据 data
    return data
  } else {
    return
  }
})
x.hooks.tap('C', (data) => {
  if (满足 C 需要处理的条件) {
    // 处理数据 data
    return data
  } else {
    return
  }
})
LoopHook
不停的循环执行 Hook,直到所有函数结果 result === undefined。同样的,由于对串行性有依赖,所以只有 SyncLoopHook 和 AsyncSeriseLoopHook
Tapable 的源码分析
Tapable 基本逻辑是,先通过类实例的 tap 方法注册对应 Hook 的处理函数, 这里直接分析 sync 同步钩子的主要流程,其他的异步钩子和拦截器等就不赘述了。
const hook = new SyncHook(['arg1', 'arg2']);从该句代码,作为源码分析的入口
class SyncHook extends Hook {
  // 错误处理,防止调用者调用异步钩子
  tapAsync() {
    throw new Error('tapAsync is not supported on a SyncHook');
  }
  // 错误处理,防止调用者调用 promise 钩子
  tapPromise() {
    throw new Error('tapPromise is not supported on a SyncHook');
  }
  // 核心实现
  compile(options) {
    factory.setup(this, options);
    return factory.create(options);
  }
}
从类 SyncHook 看到,他是继承于一个基类 Hook,他的核心实现 compile 等会再讲,我们先看看基类 Hook
// 变量的初始化
constructor(args) {
 if (!Array.isArray(args)) args = [];
 this._args = args;
 this.taps = [];
 this.interceptors = [];
 this.call = this._call;
 this.promise = this._promise;
 this.callAsync = this._callAsync;
 this._x = undefined;
}
初始化完成后,通常会注册一个事件:
// 注册
hook.tap('a', function(arg1, arg2) {
  console.log('a');
});

hook.tap('b', function(arg1, arg2) {
  console.log('b');
});
很明显这两个语句都会调用基类中的 tap 方法:
tap(options, fn) {
    // 参数处理
 if (typeof options === "string") options = { name: options };
 if (typeof options !== "object" || options === null)
  throw new Error(
   "Invalid arguments to tap(options: Object, fn: function)"
  );
 options = Object.assign({ type: "sync", fn: fn }, options);
 if (typeof options.name !== "string" || options.name === "")
  throw new Error("Missing name for tap");
 // 执行拦截器的 register 函数, 比较简单不分析
 options = this._runRegisterInterceptors(options);
 // 处理注册事件
 this._insert(options);
}
从上面的源码分析, 可以看到 _insert 方法是注册阶段的关键函数, 直接进入该方法内部
_insert(item) {
    // 重置所有的 调用 方法
 this._resetCompilation();
 // 将注册事件排序后放进taps数组
 let before;
 if (typeof item.before === "string") before = new Set([item.before]);
 else if (Array.isArray(item.before)) {
  before = new Set(item.before);
 }
 let stage = 0;
 if (typeof item.stage === "number") stage = item.stage;
 let i = this.taps.length;
 while (i > 0) {
  i--;
  const x = this.taps[i];
  this.taps[i + 1] = x;
  const xStage = x.stage || 0;
  if (before) {
   if (before.has(x.name)) {
    before.delete(x.name);
    continue;
   }
   if (before.size > 0) {
    continue;
   }
  }
  if (xStage > stage) {
   continue;
  }
  i++;
  break;
 }
 this.taps[i] = item;
}
_insert 主要是排序 tap 并放入到 taps 数组里面,排序的算法并不是特别复杂,这里就不赘述了,到了这里注册阶段就已经结束了,继续看触发阶段。
hook.call(1, 2); // 触发函数在基类 hook 中有一个初始化过程
this.call = this._call;

Object.defineProperties(Hook.prototype, {
  _call: {
    value: createCompileDelegate('call', 'sync'),
    configurable: true,
    writable: true
  },
  _promise: {
    value: createCompileDelegate('promise', 'promise'),
    configurable: true,
    writable: true
  },
  _callAsync: {
    value: createCompileDelegate('callAsync', 'async'),
    configurable: true,
    writable: true
  }
});
我们可以看出 _call 是由 createCompileDelegate 生成的,往下看
function createCompileDelegate(name, type) {
  return function lazyCompileHook(...args) {
    this[name] = this._createCall(type);
    return this[name](...args);
  };
}
createCompileDelegate 返回一个名为 lazyCompileHook 的函数,顾名思义即懒编译,直到调用 call 的时候,才会编译出正在的 call 函数。
createCompileDelegate 也是调用的 _createCall, 而 _createCall 调用了 Compier 函数
_createCall(type) {
 return this.compile({
  taps: this.taps,
  interceptors: this.interceptors,
  args: this._args,
  type: type
 });
}
compile(options) {
 throw new Error("Abstract: should be overriden");
}
可以看到 compiler 必须由子类重写,返回到 syncHook 的 compile 函数,即我们一开始说的核心方法
class SyncHookCodeFactory extends HookCodeFactory {
  content({ onError, onResult, onDone, rethrowIfPossible }) {
    return this.callTapsSeries({
      onError: (i, err) => onError(err),
      onDone,
      rethrowIfPossible
    });
  }
}

const factory = new SyncHookCodeFactory();

class SyncHook extends Hook {
  compile(options) {
    factory.setup(this, options);
    return factory.create(options);
  }
}
关键就在于 SyncHookCodeFactory 和工厂类 HookCodeFactory,先看 setup 函数
setup(instance, options) {
  // 这里的 instance 是 syncHook 实例, 其实就是把 tap 进来的钩子数组给到钩子的 _x 属性里.
  instance._x = options.taps.map(t => t.fn);
}
然后是最关键的 create 函数, 可以看到最后返回的 fn,其实是一个 new Function 动态生成的函数
create(options) {
  // 初始化参数,保存 options 到本对象 this.options,保存 new Hook(["options"]) 传入的参数到 this._args
  this.init(options);
  let fn;
  // 动态构建钩子,这里是抽象层,分同步、异步、promise
  switch (this.options.type) {
    // 先看同步
    case "sync":
      // 动态返回一个钩子函数
      fn = new Function(
        // 生成函数的参数 no before no after 返回参数字符串 xxx,xxx 在
        // 注意这里 this.args 返回的是一个字符串,
        // 在这个例子中是 options
        this.args(),
        '"use strict";\n' +
          this.header() +
          this.content({
            onError: err => `throw ${err};\n`,
            onResult: result => `return ${result};\n`,
            onDone: () => "",
            rethrowIfPossible: true
          })
      );
      break;
    case "async":
      fn = new Function(
        this.args({
          after: "_callback"
        }),
        '"use strict";\n' +
          this.header() +
          // 这个 content 调用的是子类类的 content 函数,
          // 参数由子类传,实际返回的是 this.callTapsSeries() 返回的类容
          this.content({
            onError: err => `_callback(${err});\n`,
            onResult: result => `_callback(null, ${result});\n`,
            onDone: () => "_callback();\n"
          })
      );
      break;
    case "promise":
      let code = "";
      code += '"use strict";\n';
      code += "return new Promise((_resolve, _reject) => {\n";
      code += "var _sync = true;\n";
      code += this.header();
      code += this.content({
        onError: err => {
          let code = "";
          code += "if(_sync)\n";
          code += `_resolve(Promise.resolve().then(() => { throw ${err}; }));\n`;
          code += "else\n";
          code += `_reject(${err});\n`;
          return code;
        },
        onResult: result => `_resolve(${result});\n`,
        onDone: () => "_resolve();\n"
      });
      code += "_sync = false;\n";
      code += "});\n";
      fn = new Function(this.args(), code);
      break;
  }
  // 把刚才 init 赋的值初始化为 undefined
  // this.options = undefined;
  // this._args = undefined;
  this.deinit();

  return fn;
}
最后生成的代码大致如下
"use strict";
function (options) {
  var _context;
  var _x = this._x;
  var _taps = this.taps;
  var _interterceptors = this.interceptors;
  // 我们只有一个拦截器所以下面的只会生成一个
  _interceptors[0].call(options);

  var _tap0 = _taps[0];
  _interceptors[0].tap(_tap0);
  var _fn0 = _x[0];
  _fn0(options);
  var _tap1 = _taps[1];
  _interceptors[1].tap(_tap1);
  var _fn1 = _x[1];
  _fn1(options);
  var _tap2 = _taps[2];
  _interceptors[2].tap(_tap2);
  var _fn2 = _x[2];
  _fn2(options);
  var _tap3 = _taps[3];
  _interceptors[3].tap(_tap3);
  var _fn3 = _x[3];
  _fn3(options);
}
以上就是 Tapabled 的机制,然而本篇的主要对象其实是基于 tapable 实现的 compile 和 compilation 对象。不过由于他们都是基于 tapable,所以介绍的篇幅相对短一点。
compile
compile 是什么
compiler 对象代表了完整的 webpack 环境配置。这个对象在启动 webpack 时被一次性建立,并配置好所有可操作的设置,包括 options,loader 和 plugin。当在 webpack 环境中应用一个插件时,插件将收到此 compiler 对象的引用。可以使用 compiler 来访问 webpack 的主环境。
也就是说,compile 是 webpack 的整体环境。
compile 的内部实现
class Compiler extends Tapable {
  constructor(context) {
    super();
    this.hooks = {
      /** @type {SyncBailHook<Compilation>} */
      shouldEmit: new SyncBailHook(['compilation']),
      /** @type {AsyncSeriesHook<Stats>} */
      done: new AsyncSeriesHook(['stats']),
      /** @type {AsyncSeriesHook<>} */
      additionalPass: new AsyncSeriesHook([])
      /** @type {AsyncSeriesHook<Compiler>} */
    };
  }
}
可以看到 Compier 继承了 Tapable, 并且在实例上绑定了一个 hook 对象,使得 Compier 的实例 compier 可以像这样使用
compiler.hooks.compile.tapAsync('afterCompile', (compilation, callback) => {
  console.log('This is an example plugin!');
  console.log('Here’s the `compilation` object which represents a single build of assets:', compilation);

  // 使用 webpack 提供的 plugin API 操作构建结果
  compilation.addModule(/* ... */);

  callback();
});
compilation
什么是 compilation
compilation 对象代表了一次资源版本构建。当运行 webpack 开发环境中间件时,每当检测到一个文件变化,就会创建一个新的 compilation,从而生成一组新的编译资源。一个 compilation 对象表现了当前的模块资源、编译生成资源、变化的文件、以及被跟踪依赖的状态信息。compilation 对象也提供了很多关键时机的回调,以供插件做自定义处理时选择使用。
compilation 的实现
class Compilation extends Tapable {
  /**
   * Creates an instance of Compilation.
   * @param {Compiler} compiler the compiler which created the compilation
   */
  constructor(compiler) {
    super();
    this.hooks = {
      /** @type {SyncHook<Module>} */
      buildModule: new SyncHook(['module']),
      /** @type {SyncHook<Module>} */
      rebuildModule: new SyncHook(['module']),
      /** @type {SyncHook<Module, Error>} */
      failedModule: new SyncHook(['module', 'error']),
      /** @type {SyncHook<Module>} */
      succeedModule: new SyncHook(['module']),

      /** @type {SyncHook<Dependency, string>} */
      addEntry: new SyncHook(['entry', 'name'])
      /** @type {SyncHook<Dependency, string, Error>} */
    };
  }
}
具体参考上面提到的 compiler 实现。
编写一个插件
了解到 tapable\compiler\compilation 之后, 再来看插件的实现就不再一头雾水了
class MyExampleWebpackPlugin {
  // 定义 `apply` 方法
  apply(compiler) {
    // 指定要追加的事件钩子函数
    compiler.hooks.compile.tapAsync('afterCompile', (compilation, callback) => {
      console.log('This is an example plugin!');
      console.log('Here’s the `compilation` object which represents a single build of assets:', compilation);

      // 使用 webpack 提供的 plugin API 操作构建结果
      compilation.addModule(/* ... */);

      callback();
    });
  }
}
可以看到其实就是在 apply 中传入一个 Compiler 实例,然后基于该实例注册事件,compilation 同理,最后 webpack 会在各流程执行 call 方法。
compiler 和 compilation 一些比较重要的事件钩子
compier
| 事件钩子 | 触发时机 | 参数 | 类型 |
|---|---|---|---|
| entry-option | 初始化 option | - | SyncBailHook |
| run | 开始编译 | compiler | AsyncSeriesHook |
| compile | 真正开始的编译,在创建 compilation 对象之前 | compilation | SyncHook |
| compilation | 生成好了 compilation 对象,可以操作这个对象啦 | compilation | SyncHook |
| make | 从 entry 开始递归分析依赖,准备对每个模块进行 build | compilation | AsyncParallelHook |
| after-compile | 编译 build 过程结束 | compilation | AsyncSeriesHook |
| emit | 在将内存中 assets 内容写到磁盘文件夹之前 | compilation | AsyncSeriesHook |
| after-emit | 在将内存中 assets 内容写到磁盘文件夹之后 | compilation | AsyncSeriesHook |
| done | 完成所有的编译过程 | stats | AsyncSeriesHook |
| failed | 编译失败的时候 | error | SyncHook |
compilation
| 事件钩子 | 触发时机 | 参数 | 类型 |
|---|---|---|---|
| normal-module-loader | 普通模块 loader,真正(一个接一个地)加载模块图(graph)中所有模块的函数。 | loaderContext module | SyncHook |
| seal | 编译(compilation)停止接收新模块时触发。 | - | SyncHook |
| optimize | 优化阶段开始时触发。 | - | SyncHook |
| optimize-modules | 模块的优化 | modules | SyncBailHook |
| optimize-chunks | 优化 chunk | chunks | SyncBailHook |
| additional-assets | 为编译(compilation)创建附加资源(asset)。 | - | AsyncSeriesHook |
| optimize-chunk-assets | 优化所有 chunk 资源(asset)。 | chunks | AsyncSeriesHook |
| optimize-assets | 优化存储在 compilation.assets 中的所有资源(asset) | assets | AsyncSeriesHook |
流程
调试
-
使用以下命令运行项目,./scripts/build.js 是你想要开始调试的地方
node --inspect-brk ./scripts/build.js --inline --progress -
打开 chrome://inspect/#devices 即可调试
流程图
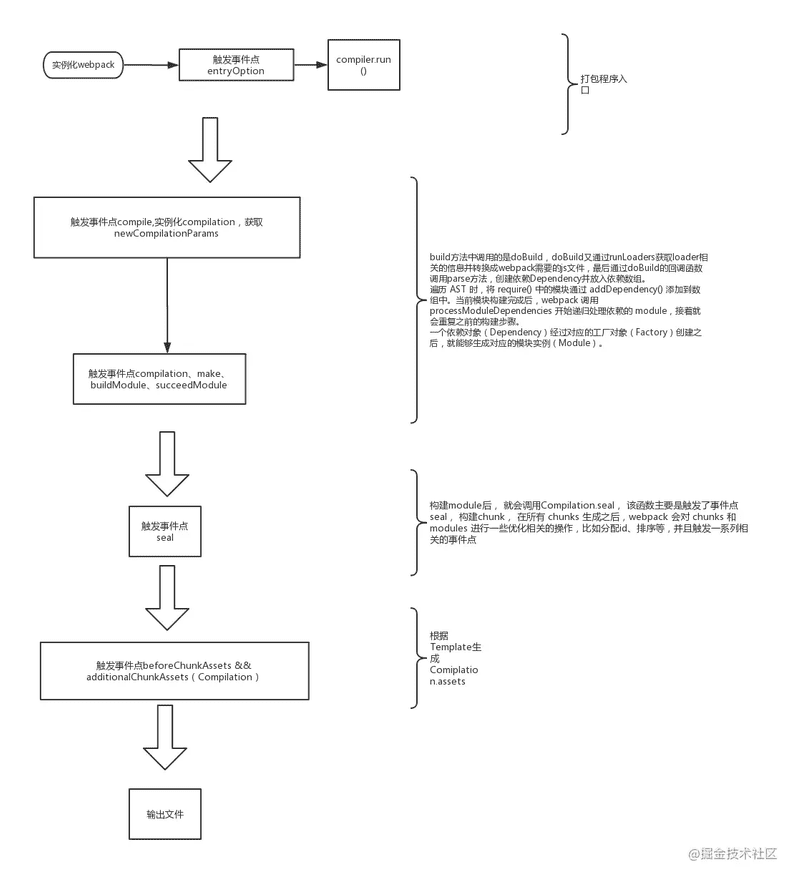
入口
入口处在 bulid.js,可以看到其中的代码是先实例化 webpack,然后调用 compiler 的 run 方法。
function build(previousFileSizes) {
  let compiler = webpack(config);
  return new Promise((resolve, reject) => {
    compiler.run((err, stats) => {
      // ...
    });
  });
}
entry-option(compiler)
webpack.js
webpack 在 node_moduls 下面的 \webpack\lib\webpack.js(在此前面有入口参数合并),找到该文件可以看到相关的代码如下
const webpack = (options, callback) => {
  let compiler;
  // 处理多个入口
  if (Array.isArray(options)) {
    compiler = new MultiCompiler(options.map((options) => webpack(options)));
  } else if (typeof options === 'object') {
    // webpack 的默认参数
    options = new WebpackOptionsDefaulter().process(options);
    console.log(options); // 见下图
    // 实例化 compiler
    compiler = new Compiler(options.context);
    compiler.options = options;
    // 对 webpack 的运行环境处理
    new NodeEnvironmentPlugin().apply(compiler);
    // 根据上篇的 tabpable 可知,这里是为了注册插件
    if (options.plugins && Array.isArray(options.plugins)) {
      for (const plugin of options.plugins) {
        plugin.apply(compiler);
      }
    }
    // 触发两个事件点 environment/afterEnviroment
    compiler.hooks.environment.call();
    compiler.hooks.afterEnvironment.call();
    // 设置 compiler 的属性并调用默认配置的插件,同时触发事件点 entry-option
    compiler.options = new WebpackOptionsApply().process(options, compiler);
  } else {
    throw new Error('Invalid argument: options');
  }
  if (callback) {
    compiler.run(callback);
  }
  return compiler;
};
可以看出 options 保存的就是本次 webpack 的一些配置参数,而其中的 plugins 属性则是 webpack 中最重要的插件。
new WebpackOptionsApply().process
function process(options, compiler) {
  let ExternalsPlugin;
  compiler.outputPath = options.output.path;
  compiler.recordsInputPath = options.recordsInputPath || options.recordsPath;
  compiler.recordsOutputPath = options.recordsOutputPath || options.recordsPath;
  compiler.name = options.name;
  compiler.dependencies = options.dependencies;
  if (typeof options.target === 'string') {
    let JsonpTemplatePlugin;
    let FetchCompileWasmTemplatePlugin;
    let ReadFileCompileWasmTemplatePlugin;
    let NodeSourcePlugin;
    let NodeTargetPlugin;
    let NodeTemplatePlugin;

    switch (options.target) {
      case 'web':
        JsonpTemplatePlugin = require('./web/JsonpTemplatePlugin');
        FetchCompileWasmTemplatePlugin = require('./web/FetchCompileWasmTemplatePlugin');
        NodeSourcePlugin = require('./node/NodeSourcePlugin');
        new JsonpTemplatePlugin().apply(compiler);
        new FetchCompileWasmTemplatePlugin({
          mangleImports: options.optimization.mangleWasmImports
        }).apply(compiler);
        new FunctionModulePlugin().apply(compiler);
        new NodeSourcePlugin(options.node).apply(compiler);
        new LoaderTargetPlugin(options.target).apply(compiler);
        break;
      case 'webworker':
        // ...
        break;
    }
    // ...
  }
  new JavascriptModulesPlugin().apply(compiler);
  new JsonModulesPlugin().apply(compiler);
  new WebAssemblyModulesPlugin({
    mangleImports: options.optimization.mangleWasmImports
  }).apply(compiler);

  new EntryOptionPlugin().apply(compiler);
  // 触发事件点 entry-options 并传入参数 context 和 entry
  compiler.hooks.entryOption.call(options.context, options.entry);
  new CompatibilityPlugin().apply(compiler);
  // ...
  new ImportPlugin(options.module).apply(compiler);
  new SystemPlugin(options.module).apply(compiler);
}
run(compiler)
调用 run 时,会先在内部触发 beforeRun 事件点,然后再在读取 records 之前触发 run 事件点,这两个事件都是异步的形式,注意 run 方法是实际上整个 webpack 打包流程的入口。可以看到,最后调用的是 compile 方法,同时传入的是 onCompiled 函数
function run(callback) {
  if (this.running) return callback(new ConcurrentCompilationError());
  const finalCallback = (err, stats) => {
    // ......
  };
  this.running = true;

  const onCompiled = (err, compilation) => {
    // ....
  };

  this.hooks.beforeRun.callAsync(this, (err) => {
    if (err) return finalCallback(err);

    this.hooks.run.callAsync(this, (err) => {
      if (err) return finalCallback(err);

      this.readRecords((err) => {
        if (err) return finalCallback(err);

        this.compile(onCompiled);
      });
    });
  });
}
compile(compiler)
compile 方法主要上触发 beforeCompile、compile、make 等事件点,并实例化 compilation,这里我们可以看到传给 compile 的 newCompilationParams 参数,这个参数在后面相对流程中也是比较重要,可以在这里先看一下
function compile(callback) {
  const params = this.newCompilationParams();
  // 触发事件点 beforeCompile,并传入参数 CompilationParams
  this.hooks.beforeCompile.callAsync(params, (err) => {
    if (err) return callback(err);
    // 触发事件点 compile,并传入参数 CompilationParams
    this.hooks.compile.call(params);
    // 实例化 compilation
    const compilation = this.newCompilation(params);
    // 触发事件点 make
    this.hooks.make.callAsync(compilation, (err) => {
      // ....
    });
  });
}
newCompilationParams 返回的参数分别是两个工厂函数和一个 Set 集合
function newCompilationParams() {
  const params = {
    normalModuleFactory: this.createNormalModuleFactory(),
    contextModuleFactory: this.createContextModuleFactory(),
    compilationDependencies: new Set()
  };
  return params;
}
compilation(compiler)
从上面的 compile 方法看, compilation 是通过 newCompilation 方法调用生成的,然后触发事件点 thisCompilation 和 compilation,可以看出 compilation 在这两个事件点中最早当成参数传入,如果你在编写插件的时候需要尽快使用该对象,则应该在该两个事件中进行。
function createCompilation() {
  return new Compilation(this);
}
function newCompilation(params) {
  const compilation = this.createCompilation();
  compilation.fileTimestamps = this.fileTimestamps;
  compilation.contextTimestamps = this.contextTimestamps;
  compilation.name = this.name;
  compilation.records = this.records;
  compilation.compilationDependencies = params.compilationDependencies;
  // 触发事件点 thisCompilation 和 compilation, 同时传入参数 compilation 和 params
  this.hooks.thisCompilation.call(compilation, params);
  this.hooks.compilation.call(compilation, params);
  return compilation;
}
下面是打印出来的 compilation 属性
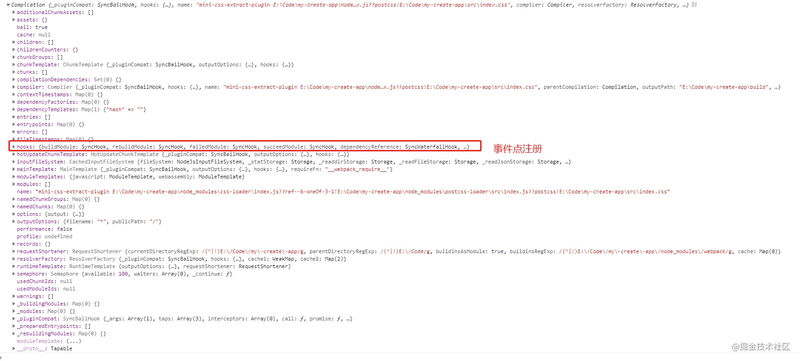
关于这里为什么要有 thisCompilation 这个事件点和子编译器(childCompiler),可以参考该文章
总结起来就是:
子编译器拥有完整的模块解析和 chunk 生成阶段,但是少了某些事件点,如”make”, “compile”, “emit”, “after-emit”, “invalid”, “done”, “this-compilation”。 也就是说我们可以利用子编译器来独立(于父编译器)跑完一个核心构建流程,额外生成一些需要的模块或者 chunk。
make(compiler)
从上面的 compile 方法知道, 实例化 Compilation 后就会触发 make 事件点了。触发了 make 时, 因为 webpack 在前面实例化 SingleEntryPlugin 或者 MultleEntryPlugin,SingleEntryPlugin 则在其 apply 方法中注册了一个 make 事件
function apply(compiler) {
  compiler.hooks.compilation.tap('SingleEntryPlugin', (compilation, { normalModuleFactory }) => {
    compilation.dependencyFactories.set(
      SingleEntryDependency,
      normalModuleFactory // 工厂函数,存在 compilation 的 dependencyFactories 集合
    );
  });

  compiler.hooks.make.tapAsync('SingleEntryPlugin', (compilation, callback) => {
    const { entry, name, context } = this;

    const dep = SingleEntryPlugin.createDependency(entry, name);
    // 进入到 addEntry
    compilation.addEntry(context, dep, name, callback);
  });
}
事实上 addEntry 调用的是 Comilation._addModuleChain,acquire 函数比较简单,主要是处理 module 时如果任务太多,就将 moduleFactory.create 存入队列等待
function _addModuleChain(context, dependency, onModule, callback) {
  // ......
  // 取出对应的Factory
  const Dep = /** @type {DepConstructor} */ (dependency.constructor);
  const moduleFactory = this.dependencyFactories.get(Dep);
  // ......
  this.semaphore.acquire(() => {
    moduleFactory.create(
      {
        contextInfo: {
          issuer: '',
          compiler: this.compiler.name
        },
        context: context,
        dependencies: [dependency]
      },
      (err, module) => {
        // ......
      }
    );
  });
}
moduleFactory.create 则是收集一系列信息然后创建一个 module 传入回调
buildModule(compilation)
回调函数主要上执行 buildModule 方法
this.buildModule(module, false, null, null, (err) => {
  // ......
  afterBuild();
});function buildModule(module, optional, origin, dependencies, thisCallback) {
// 处理回调函数
let callbackList = this._buildingModules.get(module);
if (callbackList) {
callbackList.push(thisCallback);
return;
}
this._buildingModules.set(module, (callbackList = [thisCallback]));
const callback = (err) => {
this._buildingModules.delete(module);
for (const cb of callbackList) {
cb(err);
}
};
// 触发 buildModule 事件点
this.hooks.buildModule.call(module);
module.build(
this.options,
this,
this.resolverFactory.get('normal', module.resolveOptions),
this.inputFileSystem,
(error) => {
// ......
}
);
}build 方法中调用的是 doBuild,doBuild 又通过 runLoaders 获取 loader 相关的信息并转换成 webpack 需要的 js 文件,最后通过 doBuild 的回调函数调用 parse 方法,创建依赖 Dependency 并放入依赖数组
return this.doBuild(options, compilation, resolver, fs, (err) => {
  // 在 createLoaderContext 函数中触发事件 normal-module-loader
  const loaderContext = this.createLoaderContext(resolver, options, compilation, fs);
  // .....
  const handleParseResult = (result) => {
    this._lastSuccessfulBuildMeta = this.buildMeta;
    this._initBuildHash(compilation);
    return callback();
  };

  try {
    // 调用 parser.parse
    const result = this.parser.parse(
      this._ast || this._source.source(),
      {
        current: this,
        module: this,
        compilation: compilation,
        options: options
      },
      (err, result) => {
        if (err) {
          handleParseError(err);
        } else {
          handleParseResult(result);
        }
      }
    );
    if (result !== undefined) {
      // parse is sync
      handleParseResult(result);
    }
  } catch (e) {
    handleParseError(e);
  }
});
在 ast 转换过程中也很容易得到了需要依赖的哪些其他模块。
succeedModule(compilation)
最后执行了 module.build 的回调函数,触发了事件点 succeedModule,并回到 Compilation.buildModule 函数的回调函数
module.build(
  this.options,
  this,
  this.resolverFactory.get('normal', module.resolveOptions),
  this.inputFileSystem,
  (error) => {
    // ......
    触发了事件点succeedModule;
    this.hooks.succeedModule.call(module);
    return callback();
  }
);

this.buildModule(module, false, null, null, (err) => {
  // ......
  // 执行afterBuild
  afterBuild();
});
对于当前模块,或许存在着多个依赖模块。当前模块会开辟一个依赖模块的数组,在遍历 AST 时,将 require() 中的模块通过 addDependency() 添加到数组中。当前模块构建完成后,webpack 调用 processModuleDependencies 开始递归处理依赖的 module,接着就会重复之前的构建步骤。
Compilation.prototype.addModuleDependencies = function(module, dependencies, bail, cacheGroup, recursive, callback) {
  // 根据依赖数组(dependencies)创建依赖模块对象
  var factories = [];
  for (var i = 0; i < dependencies.length; i++) {
    var factory = _this.dependencyFactories.get(dependencies[i][0].constructor);
    factories[i] = [factory, dependencies[i]];
  }
  // ...
  // 与当前模块构建步骤相同
};
最后,所有的模块都会被放入到 Compilation 的 modules 里面, 如下:

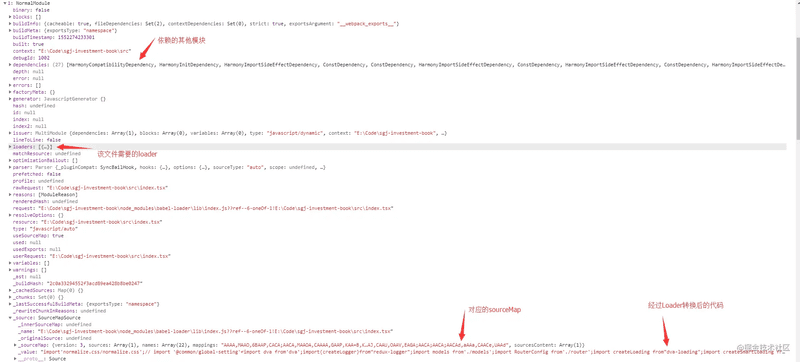
总结一下:
module 是 webpack 构建的核心实体,也是所有 module 的 父类,它有几种不同子类:NormalModule、MultiModule、ContextModule、DelegatedModule 等,一个依赖对象(Dependency,还未被解析成模块实例的依赖对象。比如我们运行 webpack 时传入的入口模块,或者一个模块依赖的其他模块,都会先生成一个 Dependency 对象。)经过对应的工厂对象(Factory)创建之后,就能够生成对应的模块实例(Module)。
seal(compilation)
构建 module 后, 就会调用 Compilation.seal, 该函数主要是触发了事件点 seal, 构建 chunk, 在所有 chunks 生成之后,webpack 会对 chunks 和 modules 进行一些优化相关的操作,比如分配 id、排序等,并且触发一系列相关的事件点
function seal(callback) {
  // 触发事件点 seal
  this.hooks.seal.call();
  // 优化
  // ......
  this.hooks.afterOptimizeDependencies.call(this.modules);

  this.hooks.beforeChunks.call();
  // 生成 chunk
  for (const preparedEntrypoint of this._preparedEntrypoints) {
    const module = preparedEntrypoint.module;
    const name = preparedEntrypoint.name;
    // 整理每个 Module 和 chunk,每个 chunk 对应一个输出文件。
    const chunk = this.addChunk(name);
    const entrypoint = new Entrypoint(name);
    entrypoint.setRuntimeChunk(chunk);
    entrypoint.addOrigin(null, name, preparedEntrypoint.request);
    this.namedChunkGroups.set(name, entrypoint);
    this.entrypoints.set(name, entrypoint);
    this.chunkGroups.push(entrypoint);

    GraphHelpers.connectChunkGroupAndChunk(entrypoint, chunk);
    GraphHelpers.connectChunkAndModule(chunk, module);

    chunk.entryModule = module;
    chunk.name = name;

    this.assignDepth(module);
  }
  this.processDependenciesBlocksForChunkGroups(this.chunkGroups.slice());
  this.sortModules(this.modules);
  this.hooks.afterChunks.call(this.chunks);

  this.hooks.optimize.call();

  // ......
  this.hooks.afterOptimizeModules.call(this.modules);

  // ......
  this.hooks.afterOptimizeChunks.call(this.chunks, this.chunkGroups);

  this.hooks.optimizeTree.callAsync(this.chunks, this.modules, (err) => {
    // ......
    this.hooks.beforeChunkAssets.call();
    this.createChunkAssets(); // 生成对应的 Assets
    this.hooks.additionalAssets.callAsync(/* ... */);
  });
}
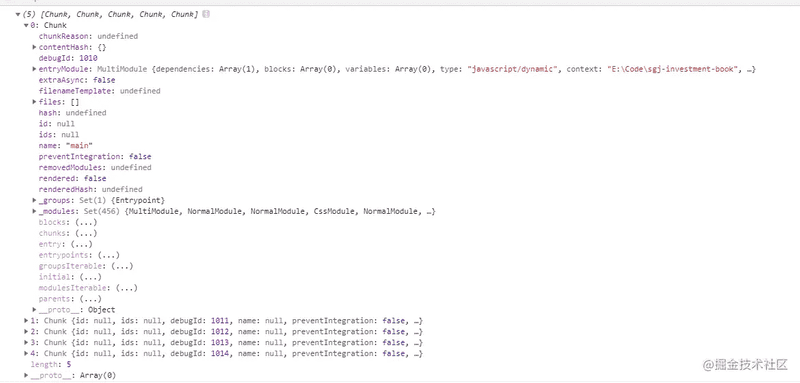
每个 chunk 的生成就是找到需要包含的 modules。这里大致描述一下 chunk 的生成算法:
- webpack 先将 entry 中对应的 module 都生成一个新的 chunk
- 遍历 module 的依赖列表,将依赖的 module 也加入到 chunk 中
- 如果一个依赖 module 是动态引入的模块,那么就会根据这个 module 创建一个新的 chunk,继续遍历依赖
- 重复上面的过程,直至得到所有的 chunks
chunk 属性图
beforeChunkAssets && additionalChunkAssets(Compilation)
在触发这两个事件点的中间时,会调用 Compilation.createCHunkAssets 来创建 assets
function createChunkAssets() {
  // ......
  // 遍历 chunk
  for (let i = 0; i < this.chunks.length; i++) {
    const chunk = this.chunks[i];
    chunk.files = [];
    let source;
    let file;
    let filenameTemplate;
    try {
      // 调用何种 Template
      const template = chunk.hasRuntime() ? this.mainTemplate : this.chunkTemplate;
      const manifest = template.getRenderManifest({
        chunk,
        hash: this.hash,
        fullHash: this.fullHash,
        outputOptions,
        moduleTemplates: this.moduleTemplates,
        dependencyTemplates: this.dependencyTemplates
      }); // [{ render(), filenameTemplate, pathOptions, identifier, hash }]
      for (const fileManifest of manifest) {
        // .....
      }
      // .....
      // 写入 assets 对象
      this.assets[file] = source;
      chunk.files.push(file);
      this.hooks.chunkAsset.call(chunk, file);
      alreadyWrittenFiles.set(file, {
        hash: usedHash,
        source,
        chunk
      });
    } catch (err) {
      // ......
    }
  }
}
createChunkAssets 会生成文件名和对应的文件内容,并放入 Compilation.assets 对象, 这里有四个 Template 的子类,分别是 MainTemplate.js、ChunkTemplate.js、ModuleTemplate.js、HotUpdateChunkTemplate.js
- MainTemplate.js: 对应了在 entry 配置的入口 chunk 的渲染模板
- ChunkTemplate: 动态引入的非入口 chunk 的渲染模板
- ModuleTemplate.js: chunk 中的 module 的渲染模板
- HotUpdateChunkTemplate.js: 对热替换模块的一个处理。
模块在封装的时候和它在构建时一样,都是调用各模块类中的方法。封装通过调用 module.source() 来进行各操作,比如说 require() 的替换。
MainTemplate.prototype.requireFn = '__webpack_require__';
MainTemplate.prototype.render = function(hash, chunk, moduleTemplate, dependencyTemplates) {
  var buf = [];
  // 每一个 module 都有一个 moduleId,在最后会替换。
  buf.push('function ' + this.requireFn + '(moduleId) {');
  buf.push(this.indent(this.applyPluginsWaterfall('require', '', chunk, hash)));
  buf.push('}');
  buf.push('');
  // ... // 其余封装操作
};
最后看看 Compilation.assets 对象
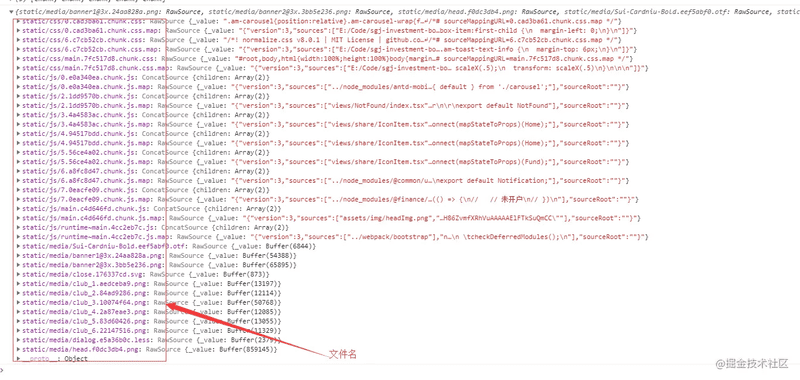
done(Compiler)
最后一步 webpack 调用 Compiler 中的 emitAssets(),按照 output 中的配置项将文件输出到了对应的 path 中,从而 webpack 整个打包过程结束。要注意的是,若想对结果进行处理,则需要在 emit 触发后对自定义插件进行扩展。